The tutorial is intended for beginners who want to build web applications with databases using the Ruby framework. You need a basic understanding of Ruby and object-oriented programming in order to be able to follow along. Furthermore, you need to be familiar with website programming in general. Let’s look at some basics first.
- Introduction
- Installation
- Framework
- Directory Structure
1. Introduction
What is Ruby?
To get a better understanding of Rails, let’s recapitulate a few points about Ruby.
Ruby is the successful combination of −
- Smalltalk’s conceptual elegance,
- Easy learning and use of Python, and
- Perl’s pragmatic approach.
Ruby is −
- Language used for high-level programming.
- Interpreted like Perl, Python, Tcl/TK.
- Object-oriented languages like Smalltalk, Eiffel, Ada, Java.
Why Ruby?
Ruby originated in Japan and is now gaining popularity in the U.S. and Europe. There are several reasons for its popularity:
- Simple to learn
- The license is very liberal (open source)
- Rich libraries
- Easy to extend
- It is truly object-oriented
- Less coding means fewer bugs
- The community is helpful
There are many reasons to use Ruby, but there are also a few drawbacks that you may have to consider before implementing Ruby –
- Performance Issues − Although it rivals Perl and Python, it is still an interpreted language and we cannot compare it with high-level programming languages like C or C++.
- Threading model − Ruby does not use native threads. Ruby threads are simulated in the VM rather than running as native OS threads.
Here is a sample Ruby code to print “Hello Ruby”
# The Hello Class
class Hello
   def initialize( name )
      @name = name.capitalize
   end
   def salute
      puts "Hello #{@name}!"
   end
end

# Create a new object
h = Hello.new("Ruby")

# Output "Hello Ruby!"
h.salute
Output −
Hello Ruby!Embedded Ruby
The Ruby language implements ERB (Embedded Ruby), written by Seki Masatoshi. ERB lets you embed Ruby codes inside an HTML file. It reads the document word-for-word, then, at a certain point, when it encounters a Ruby code embedded in the document, it starts executing the Ruby code.To prepare an ERB, you only need to know two things: −- In order to execute Ruby code, you must enclose it between <% and %>.
- To print out the result of code execution, surround it with <%= and %>.
<% page_title = "Demonstration of ERB" %>
<% salutation = "Dear programmer," %>
<html>
<head>
<title><%= page_title %></title>
  </head>
  <body>
     <p><%= salutation %></p>
     <p>This is an example of how ERB fills out a template.</p>
  </body>
</html>
Start the program by using the command-line tool erb.
i2i> erb erbdemo.rbThis will produce the following result −
<html>
   <head>
      <title>Demonstration of ERb</title>
   </head>
   <body>
      <p>Dear programmer,</p>
      <p>This is an example  of how ERb fills out a template.</p>
   </body>
</html>
What is Rails?
- A highly productive web-application framework.
- Rails allows you to develop web applications ten times faster than you would with most Java frameworks.
- Framework for developing database-backed web applications in Ruby.
- Configure your code to use Database Schema.
- Compilation is not necessary.
Full Stack Framework
- This package includes everything you need to create a database-driven web application using the Model-View-Controller pattern.
- The full-stack framework allows all the layers to work together seamlessly and with fewer lines of code.
- Code is less complex than other frameworks.
Convention over Configuration
- Rails replace configuration files with conventions, reflection, and dynamic runtime extensions.
- The code for your application and your database already contains all the information Rails needs!
Rails Strengths
There are many features in Rails that make you more productive, and many of them build on one another.
Metaprogramming
As opposed to other frameworks that use extensive code generation from scratch, Rail framework uses Metaprogramming techniques to write programs.Ruby is one of the best languages for metaprogramming, and Rails makes good use of this. While Rails also uses code generation, it relies more on Metaprogramming to do the heavy lifting.
Active Record
Rails introduce Active Record, which saves objects into a database.By using metaprogramming, the Rails Active Record discovers the columns in a database schema and automatically attaches them to your domain objects.
Convention over configuration
The majority of web development frameworks for .NET or Java require you to write pages of configuration code. By following the suggested naming conventions, Rails doesn’t need many configurations.
Scaffolding
It is common to create temporary code in the early stages of development in order to help get the application up quickly while you see how components work together. Rails automatically creates much of the scaffolding you’ll need.
Built-in testing
Rails creates simple automated tests that you can then extend. Additionally, Rails provides supporting code called harnesses and fixtures that make it easier to write and run test cases.Using the rake utility, Ruby can execute all your automated tests.
Three environments
Rails provides you with three default environments: development, testing, and production. Each one behaves differently, simplifying your entire software development process.As an example, Rails creates a new copy of the Test database for every test run.
2. Installation
To develop a web application using Ruby on Rails Framework, you need to install the following software −
- Ruby
- The Rails Framework
- A Web Server
- A Database System
We assume that you have already installed a Web Server and a Database System on your computer. You can use the WEBrick Web Server, which comes with Ruby.In production, however, most websites use Apache or lightTPD web servers.
There are many database systems that Rails can work with, including MySQL, PostgreSQL, SQLite, Oracle, DB2 and SQL Server. Set up your database by consulting the corresponding Database System Setup manual.
Here are the installation instructions for Rails on Windows and Linux.
Rails Installation on Windows
Follow the steps given below for installing Ruby on Rails.
Step 1: Check Ruby Version
Make sure you already have Ruby installed. Run ruby -v from the command prompt. If Ruby responds with a version number at or above 2.2.2, then type gem –version. You can skip the Install Ruby step if there is no error. If not, we’ll install a fresh Ruby.
Step 2: Install Ruby
To install Ruby, go to rubyinstaller.org and download the installation package. Run the resulting installer after clicking the download link. This is an exe file rubyinstaller-3.1.2.x.exe that will be installed in a single click. This is a very small package, and you’ll also get RubyGems with it. For more information, see the Release Notes.
Step 3: Install Rails
Install Rails − With Rubygems loaded, you can install Rails and its dependencies via the command line.
C:\> gem install rails
Note − It may take some time for all dependencies to be installed with the above command. Make sure you are connected to the internet when installing gems dependencies.
Step 4: Check Rails Version
Use the following command to check the rails version.
C:\> rails -v
Output:
Rails 7.0.3
Congratulations! You are now using Rails over Windows.
Rails Installation on Linux
Our Ruby On Rails installation is using rbenv on Linux. It is a lightweight Ruby Version Management Tool. The rbenv offers an easy installation procedure for managing Ruby versions, as well as a solid development environment for Ruby on Rails applications.
To install Ruby on Rails using the rbenv tool, follow the steps below.
Step 1: Install Prerequisite Dependencies
The first step is to install git – core and a few ruby dependencies that will make Ruby on Rails work. The following command will install Rails dependencies using yum.
i2i> sudo yum install -y git-core zlib zlib-devel gcc-c++ patch readline readline-devel libyaml-devel libffi-devel openssl-devel make bzip2 autoconf automake libtool bison curl sqlite-devel
Step 2: Install rbenv
We will now install rbenv and set the appropriate environment variables. Here are the commands you need to run to get rbenv for your git repository.
i2i> git clone git://github.com/sstephenson/rbenv.git .rbenv
i2i> echo 'export PATH = "$HOME/.rbenv/bin:$PATH"' >> ~/.bash_profile
i2i> echo 'eval "$(rbenv init -)"' >> ~/.bash_profile
i2i> exec $SHELL
i2i> git clone git://github.com/sstephenson/ruby-build.git ~/.rbenv/plugins/ruby-build
i2i> echo 'export PATH = "$HOME/.rbenv/plugins/ruby-build/bin:$PATH"' << ~/.bash_profile
i2i> exec $SHELL
Step 3: Install Ruby
Determine which Ruby version you want to install before you install it. We will install Ruby 2.2.3. Use the following command for installing Ruby.
i2i> rbenv install -v 3.1.2
Use the following command for setting up the current Ruby version as default.
i2i> rbenv global 3.1.2
Verify the Ruby version with the following command.
i2i> ruby -v
Output
ruby 3.1.2p20 (2022-04-12 revision 4491bb740a) [X86_64-linux]
Ruby provides a keyword gem to install the supported dependencies; we call them gems. Use the following command if you don’t want to install the documentation for Ruby-gems.
i2i> echo "gem: --no-document" > ~/.gemrc
Afterwards, you should install the Bundler gem, which helps manage your application’s dependencies. Run the following command to install the bundler gem.
i2i> gem install bundler
Step 4: Install Rails
Use the following command for installing Rails version 7.0.3.
i2i> install rails -v 7.0.3
Use the following command to make Rails executable available.
i2i> rbenv rehash
Check the rails version with the following command.
i2i> rails -v
Output
i2i> Rails 7.0.3
Ruby on Rails framework requires JavaScript Runtime Environment (Node.js) to operate. We will then see how we can use Node.js to manage Asset Pipeline, a Rails feature.
Step 5: Install JavaScript Runtime
Install Node.js from the Yum repository.We will install Node.js from the EPEL yum repository. Use the following command to add the EPEL package to the yum repository.
i2i> sudo yum -y install epel-release
Install the Node.js package using the following command.
i2i> sudo yum install nodejs
Congratulations! You are now on Rails over Linux.
Step 6: Install Database
Rails uses sqlite3 as its default database, but you may also want to install MySQL, PostgreSQL, or another RDBMS. This is optional; You can skip this step if you already have the database installed, and it is not necessary to have a database installed to run the rails server. This tutorial uses the PostgreSQL database. Therefore, use the following commands to install PostgreSQL.
i2i> sudo yum install postgresql-server postgresql-contrib
Use the following command to create a PostgreSQL database cluster after accepting the prompt.
i2i> sudo postgresql-setup initdb
Use the following command to start and enable PostgreSQL.
i2i> sudo systemctl start postgresql
i2i> sudo systemctl enable postgresql
Keeping Rails Up-to-Date
Maintaining Rails is relatively easy if you have installed it using RubyGems. We can use the same command on both Windows and Linux platforms. Use the following command −
i2i> gem update rails
It will automatically update your Rails installation. Your application will pick up this latest Rails version the next time you restart it. Make sure you are connected to the internet while using this command.
Installation Verification
By creating a demo project, you can check if everything is set up according to your requirements.
i2i> rails new demo
It will generate a demo rail project, which we will discuss later. Currently, we need to check whether the environment is set up. Run WEBrick web server by using the following command.
i2i> cd demo
i2i> rails server
In the window, while creating a new project if the below error generates then:
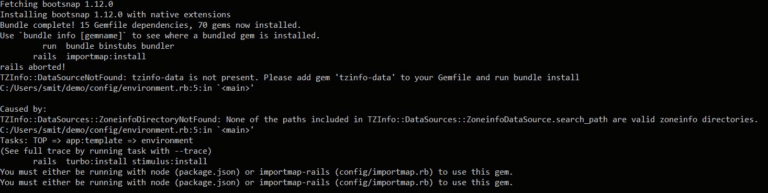
- bundle info [gemname]
where(gemname : demo)
- gem install bundler
- bundle binstubs bundler
- gem install tzinfo-data
go to Gemfile and remove the platform from gem “tzinfo-data”
- bundel update
- bundle install
It will generate auto-code to start the server
Type the following into your browser: −
http://localhost:3000
The message should say something like, “Welcome aboard” or “Congratulations”.

3. Framework
An application framework is a program, set of programs, or code library that writes most of your application for you. With a framework, you must write the parts of the application that make it do what you want.
When you set out to write a Rails application, you must perform three primary tasks in addition to configuration and housekeeping.
- Describe and model your application’s domain − The domain is the application’s sphere of influence.Among the domain types are music stores, universities, dating services, address books, and hardware inventories.Therefore, you have to figure out what’s in it, what entities are present in it, and how they interact with each other.It is equivalent to modeling a database structure to maintain the entities and their relationships.
- Define what could happen in this domain – The domain model is static; it must be dynamic. You can add addresses to an address book. You can purchase music scores from music stores. A dating service allows users to sign up. University students can register for classes.You need to identify all the possible scenarios or actions that elements of your domain can take part in.
- Design the publicly available views of the domain – At this point, you can start thinking in terms of a Web browser.After determining that your domain has students, you can imagine a welcome page, registration page, and confirmation page. On each of these pages, or views, the user can see how things stand at a certain point.
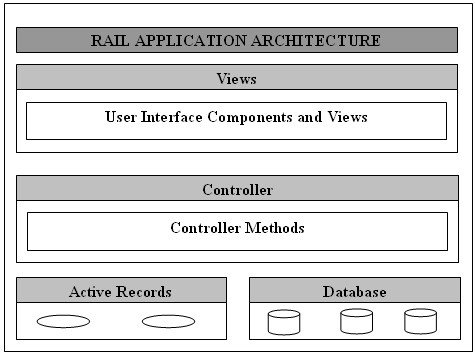
Ruby on Rails implements a Model/View/Controller (MVC) framework based on these three tasks.
Ruby on Rails MVC Framework
The Model View Controller principle divides an application’s work into three separate but closely interdependent subsystems.
Model (ActiveRecord )
It maintains the relationship between the objects and the database and handles validation, association, transactions, and more.
The ActiveRecord library implements this subsystem, which provides a binding between tables in a relational database and the Ruby program code that manipulates the database records.Using database table field names, Ruby method names are automatically generated.
View ( ActionView )
Data is presented in a particular format when a controller decides to do so. These are script-based template systems like JSP, ASP, PHP, and are easy to integrate with AJAX.
ActionView library implements this subsystem, which is an Embedded Ruby (ERb) based system for defining presentation templates for data presentations. A Rails application displays a view for every Web connection.
Controller ( ActionController )
In the application, it involves one hand querying the models for specific data, and on the other hand, organizing that data (searching, sorting, and messaging it) into a form that is appropriate for a given view.
Subsystems such as this one are implemented in ActionController, a data broker that sits between ActiveRecord and ActionView (the presentation engine).
Pictorial Representation of MVC Framework
The following is a pictorial representation of the Ruby on Rails Framework −
Directory Representation of MVC Framework
On a standard, default installation of Linux, you can find them as follows: −
i2i> cd /usr/local/lib/ruby/gems/3.1.2/gems
i2i> ls
There are a number of subdirectories, including (but not limited to) the following –
- actionpack-x.y.z
- activerecord-x.y.z
- rails-x.y.z
On a Windows installation, you’ll find them like this −
i2i>cd ruby\lib\ruby\gems\3.1.2\gems
ruby\lib\ruby\gems\3.1.2\gems\>dir
Together, ActionView and ActionController make up ActionPack.
With ActiveRecord, you can manipulate data from an SQL database using a range of programming techniques and shortcuts.It provides facilities for manipulating and displaying that data via the ActionController and ActionView.Rails ties it all together.
4. Directory Structure
The Rails helper script creates all of the directory structures for your application when you use it to create it. In this structure, Rails knows where to find the things it needs, so you don’t need to provide any input.
This is a top-level view of the directory tree created by the helper script at the time of application creation. Every Rails project will have the same structure and naming convention, except for minor changes between releases. The consistency between Rails projects gives you a tremendous advantage; you will be able to move between them without having to relearn their organization.
To Let’s use the demo application created in the Installation chapter to learn about this directory structure. It is easy to create using a rails helper command.
Now, go to the demo application root directory as follows −
i2i> cd demo
demo> dir
The directory structure in Windows is as follows:
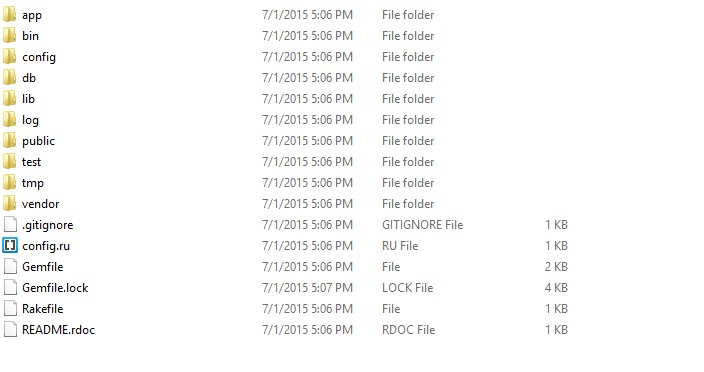
Now let’s explain the purpose of each directory
- app − It organizes the components of your application. Subdirectories hold the views (views and helpers), controllers (controllers), and backend logic (models).
- app/controllers − Rails looks for controller classes in the controllers subdirectory. A controller handles a user’s request.
- app/helpers − The helpers subdirectory contains the classes used to assist the model, view, and controller classes. By doing this, we keep the model, view, and controller code simple, focused, and uncluttered.
- app/models − The models subdirectory contains the classes that model and wrap the data stored in our application’s database. This part of the application can grow pretty messy, tedious, verbose, and error-prone in most frameworks. Rails makes it a snap!
- app/view − This subdirectory holds the display templates that we will fill in with data from our application, convert to HTML, and then send to the user’s browser.
- app/view/layouts − Contains the template files for using layouts with views. They use the common header/footer wrapping method. Create a file named default.html.erb in your views and define a layout as layout:default. In default.html.erb, call <% yield %> to render the view using this layout.
- components − The components directory consists of tiny self-contained applications that bundle model, view, and controller.
- config − This file contains the configuration code for your application, including your database configuration (in database.yml), your Rails environment structure (environment.rb), and routing of incoming web requests (routes.rb). You can also customize the behavior of the three Rails environments for test, development, and deployment using the environments directory.
- db − Rails applications typically contain model objects that refer to relational database tables. You can manage the relational database with scripts you create and place in this directory.
- doc − The RubyDoc framework creates documentation for your code automatically.By commenting your code, you can assist RubyDoc. RubyDoc-generated application and Rails documentation can be found here.
- lib − Libraries will go here unless they belong somewhere else (such as vendor libraries).
- log − Here are the error logs. Rails creates scripts to help you manage error logs. You’ll find separate log files for each Rails environment (development.log, test.log, and production.log) and the server (server.log).
- public − The public directory for a web server contains web files that don’t change, for example, JavaScript files (public/javascripts), graphics files (public/images), stylesheets (public/stylesheets), and HTML files (public).
- script −The scripts in this directory launch and manage the various tools you’ll need for Rails. Examples include scripts to generate code (generate) and launch the web server (server).
- test − This is where you write your tests and Rails creates them for you. You’ll see subdirectories for mocks (mocks), unit tests (unit), fixtures (fixtures), and functional tests (functional).
- tmp − Rails uses this directory to store temporary files for intermediate processing.
- vendor − Here you will find libraries provided by third parties (such as security libraries or database utilities beyond the basic Rails distribution).
In addition to these directories, there are two files in the demo directory.
- README − There is a brief description of Rail Application and its directory structure in this file.
- Rakefile − Makefiles are similar to Unix Makefiles, and they help build, package, and test the Rails code. This will be used by the rake utility installed along with the Ruby installation.
This is basic information about Ruby on Rails like installation, the pattern of coding, and the structure of the directory. In the next chapter, you will deeper dive in ROR.