Some front-end Frameworks like React, Angular, or Vue have a system of components where each one internally manages its own states, and of course, as the application becomes complex, its state management becomes complex as well.
Where Redux comes into the clutch?
This popular state management library works with a kind of main “store” where all the states of the application are located and each of the components can access this particular store. However, when this store needs to be optimized, the configuration requires, in some cases, a lot of repetitive code. In addition, some other necessary packages that enable scalability are required.
To address these challenges, the redux team created the redux Toolkit, which accelerates many best practices configs for redux beginners or redux developers who want simple, fast, and clean
code.
Features:
- Simple: Includes utilities to simplify common use cases such as store configuration, reducer creation, and immutable update logic.
- Opinionated: Provides good defaults for store configuration out of the box and includes the most commonly used Redux plugins.
- Powerful: Takes inspiration from libraries such as Immer to allow you to write immutable update logic in a “mutable” way.
- Effective: This allows you to focus on the core logic your application needs, so you can do more work with less code.
How to setup create-react-app With Redux:
For this redux tutorial let’s start with setup a new react application with CRA:
npm install -g create-react-app
create-react-app redux-tutorial
cd redux-tutorial
Next, we will add redux with:
npm install --save react-redux @reduxjs/toolkit
Firstly configure the store. Create file src/store/index.js containing:
import { configureStore } from '@reduxjs/toolkit'
import { combineReducers } from 'redux'
const reducer = combineReducers({
// here we will be adding reducers
})
const store = configureStore({
reducer,
})
export default store;
configureStore accepts a single object rather than multiple function arguments. It’s because, under the hood, the store has been configured to allow using the Redux DevTools Extension and has had some Redux middleware included by default.
Then we need to connect our store to the React application. Import it into index.js like this:
import { Provider } from 'react-redux'
import store from './store'
ReactDOM.render(
  <Provider store={store}>
  <App />
  </Provider>,
  document.getElementById('root')
)
Provider wraps the App and the whole application has access to Redux. If you start your application with npm start and open Redux Dev Tools you should see @@INIT. Congratulations you have set up redux!
How to structure your Redux:
Let’s now set up Redux authentication and implement a simple login form and logout button shown after authentication. Redux itself does not care about how your application’s folders and files are structured. However, co-locating logic for a given feature in one place typically makes it easier to maintain that code.
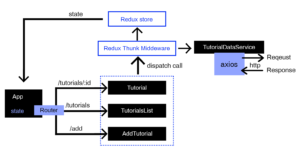
Redux.org recommend that most applications should structure files using a “feature folder” approach (all files for a feature in the same folder) or the “ducks” pattern (all Redux logic for a feature in a single file), rather than splitting logic across separate folders by “type” of code (reducers, actions, etc).
Let’s add src/store/user.js store slice:
import { createSlice } from '@reduxjs/toolkit'

// Actions
const { loginSuccess, logoutSuccess } = slice.actions
export const login = ({ username, password }) => async dispatch => {
try {
 // const res = await api.post('/api/auth/login/', { username, password })
  dispatch(loginSuccess({username}));
  } catch (e) {
    return console.error(e.message);
  }
}
 export const logout = () => async dispatch => {
 try {
   // const res = await api.post('/api/auth/logout/')
   return dispatch(logoutSuccess())
  } catch (e) {
    return console.error(e.message);
  }
}

// Slice
 const slice = createSlice({
 name: 'user',
 initialState: {
 user: null,
},
 reducers: {
 loginSuccess: (state, action) => {
 state.user = action.payload;
 },
 logoutSuccess: (state, action) => {
  state.user = null;
  },
 },
});

export default slice.reducer
The store feature file contains createSlice which returns a “slice” object that contains the generated reducer function as a field named reducer, and the generated action creators inside an object called actions.
At the bottom, we can import the action creators and export them directly or use them within async actions, like login and logout.
To connect the reducer to Redux, we have to add it to the main reducer in
store/index.js:
import user from './user'
const reducer = combineReducers({
user,
})
Connecting Redux to Components with useDispatch and useSelector:
Our redux setup is ready. Now, let’s configure the Authentication form. For this we
will use Formik. Type the following into your terminal:
npm install --save formik
Now we can create the following src/App.js component:
import {useDispatch, useSelector} from 'react-redux'
import {Field, Form, Formik} from 'formik'
import {login, logout} from './store/user'
function App() {
const dispatch = useDispatch()
const { user } = useSelector(state => state.user)
if (user) {
return (
<div>
Hi, {user.username}!
<button onClick={() => dispatch(logout())}>Logout</button>
</div>
)
}
return (
<div>
<Formik
initialValues={{ username: '', password: '' }}
onSubmit={(values) => { dispatch(login(values)) }}
>
{({ isSubmitting }) => (
<Form>
<Field type="text" name="username" />
<Field type="password" name="password" />
<button type="submit" disabled={isSubmitting}>Login</button>
</Form>
)}
</Formik>
</div>
);
}
Summary:
It’s amazing how simple it is to set up Redux. We used tools like @reduxjs/toolkit, React Hooks, and Axios to simplify things. Redux Toolkit covers many standard cases by default and still leaves space for customization.