In the previous section, How you can do different kinds of animation and transition in vuejs and how do Directives and routing work in vuejs?. Let’s move further in this section covers topics described below with full details and examples.
- Mixins
- Render Function
- Reactive Interface
1. Mixins
The purpose of mixins is to work with components. They enable components to share code. When a component uses mixin, all options of mixin become available to the component.
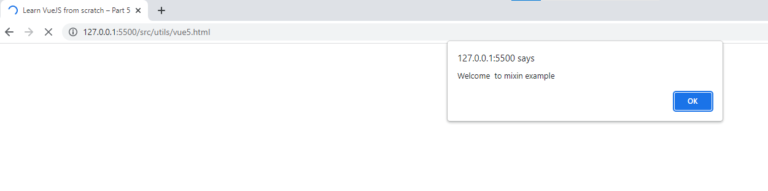
Example:

<html>
   <head>
      <title>VueJs Instance</title>
      <script type = "text/javascript" src = "js/vue.js"></script>
   </head>
   <body>
      <div id = "databinding"></div>
      <script type = "text/javascript">
         var vm = new Vue({
            el: '#databinding',
            data: {
            },
            methods : {
            },
         });
         var myMixin = {
            created: function () {
               this.startmixin()
            },
            methods: {
               startmixin: function () {
                  alert("Welcome  to mixin example");
               }
            }
         };
         var Component = Vue.extend({
           mixins: [myMixin]
         })
         var component = new Component();
      </script>
   </body>
</html>
Output:
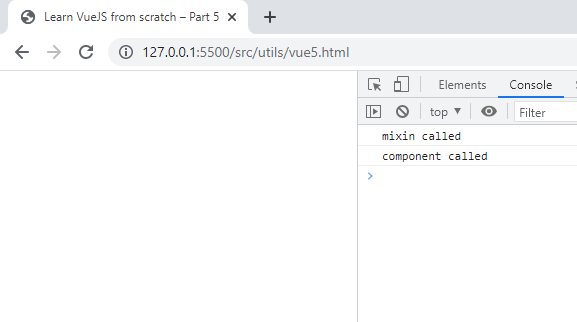
<html>
   <head>
      <title>VueJs Instance</title>
      <script type = "text/javascript" src = "js/vue.js"></script>
   </head>
   <body>
      <div id = "databinding"></div>
      <script type = "text/javascript">
         var mixin = {
            created: function () {
               console.log('mixin called')
            }
         }
         new Vue({
            mixins: [mixin],
            created: function () {
               console.log('component called')
            }
         });
      </script>
   </body>
</html>
Now the mixin and the vue instance have the same method. Here’s what we see in the console. This will merge the vue and mixin options.
In the event that we have the same function name in methods, then the main vue instance will take precedence.
Example:

<html>
   <head>
      <title>VueJs Instance</title>
      <script type = "text/javascript" src = "js/vue.js"></script>
   </head>
   <body>
      <div id = "databinding"></div>
      <script type = "text/javascript">
         var mixin = {
            methods: {
               hellworld: function () {
                  console.log('In HelloWorld');
               },
               samemethod: function () {
                  console.log('Mixin:Same Method');
               }
            }
         };
         var vm = new Vue({
            mixins: [mixin],
            methods: {
               start: function () {
                  console.log('start method');
               },
               samemethod: function () {
                  console.log('Main: same method');
               }
            }
         });
         vm.hellworld();
         vm.start();
         vm.samemethod();
      </script>
   </body>
</html>
We will see that mixin has a method property in which helloworld and samemethod functions are defined. Similar to vue instance, vue instance has a methods property where start and samemethod are defined.
Each of the following methods are called.
vm.hellworld(); // In HelloWorld
vm.start(); // start method
vm.samemethod(); // Main: same method
The functions helloworld, start, and samemethod were called above. The same method is also present in the mixin, but priority will be given to the main instance, as shown in this console.

2. Render Function
We have seen the components and their usage of it. For instance, we need to reuse a piece of content across the project. We can convert it into a component and use it.In this example, we will see what the render function does within a simple component.Example:
<html>
<head>
<title>VueJs Instance</title>
<script type = "text/javascript" src = "js/vue.js"></script>
</head>
<body>
<div id = "component_test">
<testcomponent></testcomponent>
</div>
<script type = "text/javascript">
Vue.component('testcomponent',{
template : '<h1>Hello World</h1>',
data: function() {
},
methods:{
}
});
var vm = new Vue({
el: '#component_test'
});
</script>
</body>
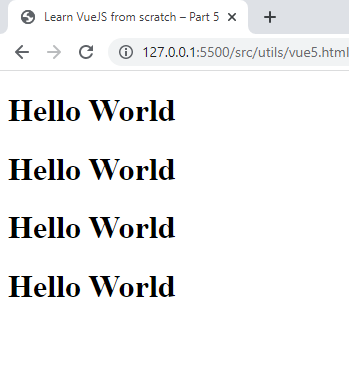
</html>Here is an example of a simple component that prints Hello World as shown in the following screenshot.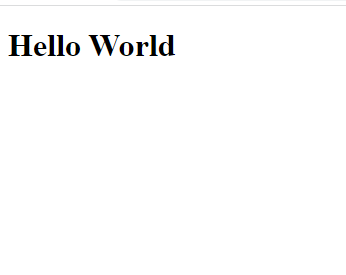
If we want to reuse the component, we can just print it again. For example,
<div id = "component_test">
   <testcomponent></testcomponent>
   <testcomponent></testcomponent>
   <testcomponent></testcomponent>
   <testcomponent></testcomponent>
</div>
And the output will be the following.

However, we need to make some changes to the component. We don’t want to print the same text twice. How can we change it? If we type something inside the component, will that be taken into account?
Let us consider the following example and see what happens.
<div id = "component_test">
   <testcomponent>Hello Jai</testcomponent>
   <testcomponent>Hello Roy</testcomponent>
   <testcomponent>Hello Ria</testcomponent>
   <testcomponent>Hello Ben</testcomponent>
</div>
Output remains the same as before. Text does not change as we want it to.
Example:

<html>
   <head>
      <title>VueJs Instance</title>
      <script type = "text/javascript" src = "js/vue.js"></script>
   </head>
   <body>
      <div id = "component_test">
         <testcomponent>Hello Jai</testcomponent>
         <testcomponent>Hello Roy</testcomponent>
         <testcomponent>Hello Ria</testcomponent>
         <testcomponent>Hello Ben</testcomponent>
      </div>
      <script type = "text/javascript">
         Vue.component('testcomponent',{
            template : '<h1><slot></slot></h1>',
            data: function() {
            },
            methods:{
            }
         });
         var vm = new Vue({
            el: '#component_test'
         });
      </script>
   </body>
</html>
Using the above code, we have added a slot to the template, hence now it will send the value inside the component, as seen in the following screenshot.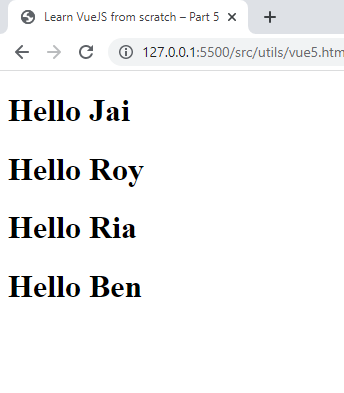
Let’s say we want to change the size and color. For example, we are currently using h1 tag and need to change HTML tag to p tag or div tag for the same component. How can we accommodate so many changes without getting overwhelmed?
The render function allows us to do this. By keeping it common and passing arguments with the same component, render functions assist in making components dynamic and easy to use.
Example:

<html>
   <head>
      <title>VueJs Instance</title>
      <script type = "text/javascript" src = "js/vue.js"></script>
   </head>
   <body>
      <div id = "component_test">
         <testcomponent :elementtype = "'div,red,25,div1'">Hello Jai</testcomponent>
         <testcomponent :elementtype = "'h3,green,25,h3tag'">Hello Roy</testcomponent>
         <testcomponent :elementtype = "'p,blue,25,ptag'">Hello Ria</testcomponent>
         <testcomponent :elementtype = "'div,green,25,divtag'">Hello Ben</testcomponent>
      </div>
      <script type = "text/javascript">
         Vue.component('testcomponent',{
            render :function(createElement){
               var a = this.elementtype.split(",");
               return createElement(a[0],{
                  attrs:{
                     id:a[3],
                     style:"color:"+a[1]+";font-size:"+a[2]+";"
                  }
               },
               this.$slots.default
               )
            },
            props:{
               elementtype:{
                  attributes:String,
                  required:true
               }
            }
         });
         var vm = new Vue({
            el: '#component_test'
         });
      </script>
   </body>
</html>
Using the above code, we have changed our component and added a render function with props property.Vue.component('testcomponent',{
render :function(createElement){
var a = this.elementtype.split(",");
return createElement(a[0],{
attrs:{
id:a[3],
style:"color:"+a[1]+";font-size:"+a[2]+";"
}
},
this.$slots.default
)
},
props:{
   elementtype:{
      attributes:String,
      required:true
   }
}
});The props look like the following.props:{
elementtype:{
attributes:String,
required:true
}
}We have defined a property called elementtype, which accepts attributes of type string. And another required field, which indicates that the field is mandatory.The following code shows how we used the elementtype property in the render function.render :function(createElement){
var a = this.elementtype.split(",");
return createElement(a[0],{
attrs:{
id:a[3],
style:"color:"+a[1]+";font-size:"+a[2]+";"
}
},
this.$slots.default
)
}The render function takes createElement as an argument and returns the same. Similarly to JavaScript, CreateElement creates the DOM element. Additionally, we have split the elementtype using a comma and the attrs field.In CreateElement, the first parameter indicates the elementtag to be created. This parameter is passed to the component using the following code.<testcomponent :elementtype = "'div,red,25,div1'">Hello Jai</testcomponent>As shown above, the component needs to take the props field. It starts with : and contains the name of the props. In this case, we are passing the element tag, color, fontsize, and id.Our render function, createElement, splits on commas, so the first element is the elementtag, which is passed to createElement as shown in the following code.
return createElement(
   a[0],{
      attrs:{
         id:a[3],
         style:"color:"+a[1]+";font-size:"+a[2]+";"
      }
   },
   this.$slots.default
)
The html element tag is a[0]. The next parameter specifies the attribute values for the element tag. The following piece of code defines them in the attr field.attrs:{
id:a[3],
style:"color:"+a[1]+";font-size:"+a[2]+";"
}There are two attributes for the element tag – id and style. We are passing id a[3], which is the value we have after splitting on a comma. Font size and color are set through style.We also have a slot in this code block. That’s the message we have given in the component.<testcomponent :elementtype = "'div,red,25,div1'">Hello Jai</testcomponent>With the following code, we have defined the text to be printed in the createElement.this.$slots.defaultIt uses the component field’s default value.We get the following output in the browser.
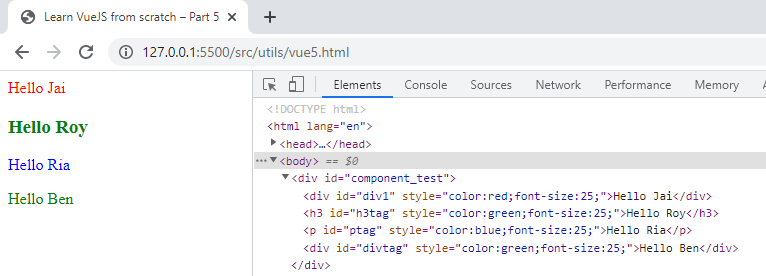
The elements also reveal the structure. Here is a list of the components we defined.
<div id = "component_test">
   <testcomponent :elementtype = "'div,red,25,div1'">Hello Jai</testcomponent>
   <testcomponent :elementtype = "'h3,green,25,h3tag'">Hello Roy</testcomponent>
   <testcomponent :elementtype = "'p,blue,25,ptag'">Hello Ria</testcomponent>
   <testcomponent :elementtype = "'div,green,25,divtag'">Hello Ben</testcomponent>
</div>
3. Reactive Interface
With VueJS, properties can be added dynamically, which allows for reactivity. Let’s assume we have already created a vue instance and need to add the watch property. It can be done as follows −
Example:

<html>
   <head>
      <title>VueJs Instance</title>
      <script type = "text/javascript" src = "js/vue.js"></script>
   </head>
   <body>
      <div id = "app">
         <p style = "font-size:25px;">Counter: {{ counter }}</p>
         <button @click = "counter++" style = "font-size:25px;">Click Me</button>
      </div>
      <script type = "text/javascript">
         var vm = new Vue({
            el: '#app',
            data: {
               counter: 1
            }
         });
         vm.$watch('counter', function(nval, oval) {
            alert('Counter is incremented :' + oval + ' to ' + nval + '!');
         });
         setTimeout(
            function(){
               vm.counter = 20;
            },2000
         );
      </script>
   </body>
</html>
The property counter of the data object is 1. We increment the counter after clicking the button.Vue instance already exists. We need to add watch to it as follows −vm.$watch('counter', function(nval, oval) {
alert('Counter is incremented :' + oval + ' to ' + nval + '!');
});To add a watch outside the vue instance, we must use $watch. A new alert shows the change in value for the counter property. A timer function is also added, setTimeout, which sets the counter to 20.setTimeout(
function(){
vm.counter = 20;
},2000
);Watch method will fire an alert whenever the counter changes, as shown in the screenshot below.
VueJS cannot detect property additions or deletions. In the Vue instance, properties should always be declared upfront, so that they can be reactive. If we need to add properties at run time, we can use the Vue global, Vue.set, and Vue.delete methods.
Vue.set
Sets a property on an object using this method. Vue cannot detect property additions when using this method.
Syntax
Vue.set( target, key, value )
Where,
target: Can be an object or an array
key : Can be a string or number
value: Can be any type
Let’s take a look at an example.
Example:
<html>
<head>
<title>VueJs Instance</title>
<script type = "text/javascript" src = "js/vue.js"></script>
</head>
<body>
<div id = "app">
<p style = "font-size:25px;">Counter: {{ products.id }}</p>
<button @click = "products.id++" style = "font-size:25px;">Click Me</button>
</div>
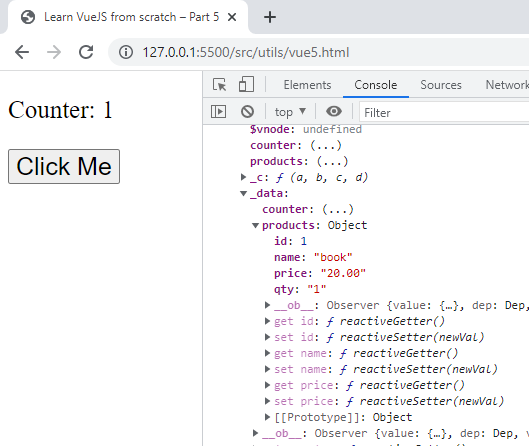
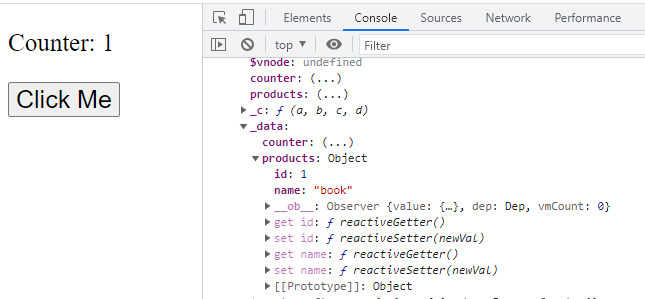
<script type = "text/javascript">
var myproduct = {"id":1, name:"book", "price":"20.00"};
var vm = new Vue({
el: '#app',
data: {
counter: 1,
products: myproduct
}
});
vm.products.qty = "1";
console.log(vm);
vm.$watch('counter', function(nval, oval) {
   alert('Counter is incremented :' + oval + ' to ' + nval + '!');
});
</script>
</body>
</html>Following is the code that creates the variable myproduct at the beginning of the example.var myproduct = {"id":1, name:"book", "price":"20.00"};In a Vue instance, it is given to the data object as follows: −var vm = new Vue({
el: '#app',
data: {
counter: 1,
products: myproduct
}
});Consider adding one more property after the Vue instance has been created to the myproduct array.vm.products.qty = "1";Let’s see the output in the console.

As can be seen above, quantity is added to products. The get/set methods, which basically add reactivity, are only available for the id, name, and price, but not for qty.
We cannot achieve reactivity by simply adding vue objects. VueJS generally wants all of its properties created at the start; however, if we need to add them later, we can use Vue.set. For this, we need to set it using vue global, i.e. Vue.set.
Example:
<html>
<head>
<title>VueJs Instance</title>
<script type = "text/javascript" src = "js/vue.js"></script>
</head>
<body>
<div id = "app">
<p style = "font-size:25px;">Counter: {{ products.id }}</p>
<button @click = "products.id++" style = "font-size:25px;">Click Me</button>
</div>
<script type = "text/javascript">
var myproduct = {"id":1, name:"book", "price":"20.00"};
var vm = new Vue({
   el: '#app',
   data: {
      counter: 1,
      products: myproduct
   }
});
Vue.set(myproduct, 'qty', 1);
console.log(vm);
vm.$watch('counter', function(nval, oval) {
alert('Counter is incremented :' + oval + ' to ' + nval + '!');
});
</script>
</body>
</html>In the following piece of code, we add the quantity to the array using Vue.set.Vue.set(myproduct, 'qty', 1);Here is the output from consoleing the vue object.
The get/set for qty added can now be seen using Vue.set.
Vue.delete
Dynamically delete the property using this function.
Example:
Vue.delete( target, key )
Where,
target: Can be an object or an array
key: Can be a string or a number
To delete any property, we can use Vue.delete as in the following code.
Example:

<html>
   <head>
      <title>VueJs Instance</title>
      <script type = "text/javascript" src = "js/vue.js"></script>
   </head>
   <body>
      <div id = "app">
         <p style = "font-size:25px;">Counter: {{ products.id }}</p>
         <button @click = "products.id++" style = "font-size:25px;">Click Me</button>
      </div>
      <script type = "text/javascript">
         var myproduct = {"id":1, name:"book", "price":"20.00"};
         var vm = new Vue({
            el: '#app',
            data: {
               counter: 1,
               products: myproduct
            }
         });
         Vue.delete(myproduct, 'price');
         console.log(vm);
         vm.$watch('counter', function(nval, oval) {
            alert('Counter is incremented :' + oval + ' to ' + nval + '!');
         });
      </script>
   </body>
</html>
We have used Vue.delete to delete the price from the array using the following code.Vue.delete(myproduct, 'price');Following is the output, we see in the console.
When we delete the item, we can only see the id and name since the price is deleted. We can also see that the get/set methods are removed as well.